How to get Green ticks on Google Drive back

Google Drive no Syncy for you

I’ve been using Google Drive to sync files for some time now, because it’s great having 15GB of storage sitting in the cloud that I can access anytime.  I’m not here to point out the merits of having a google account that needlessly and continually asks me to come back to my google+ account, and yes I find it annoying that gmail now separates my mail into confusing tabs that really don’t have any meaning to me.  That little rant is for another article.  Today, I’m going to show you how to get the green tick marks back on your google drive to show that all your files are syncing.

When I had google drive, I found I needed more cloud storage, so I installed Skydrive and most recently installed the Synology Cloud Station product.  What this does is make my bottom toolbar look like it threw up as I have close to 20 icons sitting in the corner.  Call me OCD, but I need to see all my icons and having them hidden drives me bananas. The problem with Windows Explorer is that it only allows for 15 slots for icon overlays.  What does this mean?  When you put more changing icons (such as the aforementioned skydrive, google drive that requires icons change to green for synced, red for unsyncable, or yellow or whatever color) you’re using up that 15 slot overlay.  In my case, my Google Drive puked and turned all the folders and files inside into normal looking icons – which normally wouldn’t be a problem, but I couldn’t see if any files had problems getting up to the cloud.  Here, I’ve compiled an easy to follow fix should you encounter the same situation.

These instructions are for Windows 7, and I’ve heard they work on Windows 8 as well.

1. Run Regedit and navigate to HKEY\LOCAL_MACHINE\SOFTWARE\Microsoft\Windows\CurrentVersion\Explorer\ShellIconOverlayIdentifiers\

2.  Find these 3 entries: ‘GDriveSharedOverlay’, ‘GDriveSyncedOverlay’ and ‘GDriveSyncingOverlay’

Gdrive registry before
3. Add a prefix ahead of them: ‘0GDriveSharedOverlay’, ‘1GDriveSyncingOverlay’ and ‘2GDriveSyncedOverlay’, so it should look like this now:

Gdrive registry before-and after

4. Reboot your PC and take a look at your google drive icons – they should all re-appear with the green ticks:

folders after

You will have to repeat these steps over time, or whenever you overfill the 15 icon buffer limit on your Windows machine -so keep that in mind.

Handy App of the Day: SearchMyFiles

The other day I was tasked with finding all the duplicates in a large network share.  Large as in: 2TB worth of company data.  The previous IT company wasn’t so good at house cleaning so I was given the assignment of finding all the duplicate data that existed and archiving or deleting it to save space on backups.  After a little research, I found my answer in Nirsoft’s SearchMyFiles.

I’ve mentioned Nirsoft in the past with their export text software, and the SearchMyFiles app is another impressive tool they offer for free.

My first searches were for duplication software, it was only by pure luck that I stumbled across this gem as it was named a ‘search’ utility, and not a ‘duplicate’ utilty.  The functionality is right in the dropdown!

SearchMyFiles with Duplicates finder.  No frills here, options are simple and easy to configure
SearchMyFiles with Duplicates finder. No frills here, options are simple and easy to configure

While the software isn’t the prettiest, it is by far the most powerful and menu friendly.  No need to look and bump around with file and options as it’s all laid out to see.  There’s no installer either, so it’s a small footprint and can be run directly from a USB stick.

After about an hour, I had search results I could export into a spreadsheet and pour over with a fine tooth comb.

As you would imagine, the regular search utility works awesomely fast as well – going through a network share was a breeze, and you can specify how many folders deep you can go (infinite is an option).

Well done NirSoft, you’ve saved my bacon again!

-Dexter

Configuring NPS on Server 2012 with Cisco WLC: Part 2

In part 1 of this tutorial, I stepped through configuration of the Cisco Equipment and configuration of the Network Policy Server with Certificate.  In this tutorial, I’ll show you how to tie it all up in Group Policy.

This tutorial already assumes you have the following:
*Group Policy objects SPECIFICALLY for laptop computers
*CA certificate created

Group Policy can make your life easier especially if you have a large environment.  It’s important to have a good, CLEAN Active Directory free of clutter or orphaned objects (re: objects you don’t know about).  I suggest separating your computer accounts by PC and Laptop, laptops will get the wireless group policy while the PC’s won’t as they are typically hard lined into a RJ45 Jack.

First, create a new GPO: give it a meaningful name

Image 001

Once created, drill down into Computer Configuration->Windows Settings->Wireless Network (802.11) Policies and create a new Windows Vista (AKA Windows 7-8) Policy.  Tailor this to your needs, you can easily create a Windows XP Policy as the screens are very similar.

Image 002

Create a Policy Name, I gave mine simply ‘Corporate Wifi’.  I also used the Windows WLAN configuration utility.  This means if you’re using the Dell connect utility or the HP connection manager this Group Policy will not work.  Again, depending on the laptops you’re configuring you’ll have to make adjustments.  This guide assumes you’re formatting laptops with standard Windows Operating Systems with no additional bloatware.

After giving it a policy name, add an Infrastructure network (on the bottom).

Image 003

The Profile Name will be what shows the client is connected to – this means you have the opportunity to give your SSID another name to your internal employees.  For this example, I have an SSID of ‘Super-Secret-Wireless’, but the Profile name is simply ‘Wifi profile’.  When your users connect to wireless, they will only see they are connected to ‘Wifi profile’.

Image 004

Click the Security Tab to change your SSID’s security settings.  I’m using WP2-Enterprise authentication with PEAP and a certificate.  To choose the certificate, click on Properties beside your authentication method.

Image 005

Ensure you’re validating the Server Certificate, then put a checkmark on the certificate you created in the first part of this tutorial.  To ensure you clients have the certificate, you can use a GPO to install the certificate for you automatically.

Image 006

Once you’ve added the profile, you’ll see it as one of the SSID’s in your associated Vista wireless policy

Image 007

That’s about it.  As long as your client has the certificate, and you force a GPUPDATE they should be connected to your new wireless without your need to touch every laptop.

Image 008

The last tutorial was done on Server 2012, these screen caps were done from a 2008 server.  Don’t worry, most of the content is still the same across both operating systems.

Configuring NPS on Server 2012 with Cisco WLC: Part 1

This How-to article is meant to configure Windows Server 2012 Network Policy Server, Certificate Authority with a Cisco WLC 2504 series (with Software version 7.4.100.0)

As specific as that list is, much of what Cisco offers with older IOS versions still holds true.  The authentication model still works, particularly the 802.1x configurations.  From the get go, you will have to create a new certificate if it’s not a Domain Controller.  This link explains in depth creation of a Certificate for use on a PEAP authentication model.  If you do have a domain controller, you can use the domain certificate for this purpose.

I recommend creation of a an RAS-IAS certificate and pushing the certificate via GPO, namely as you can change the expiration date of the certificate (like 10 years in the future if you really want).

First, configure the NPS:

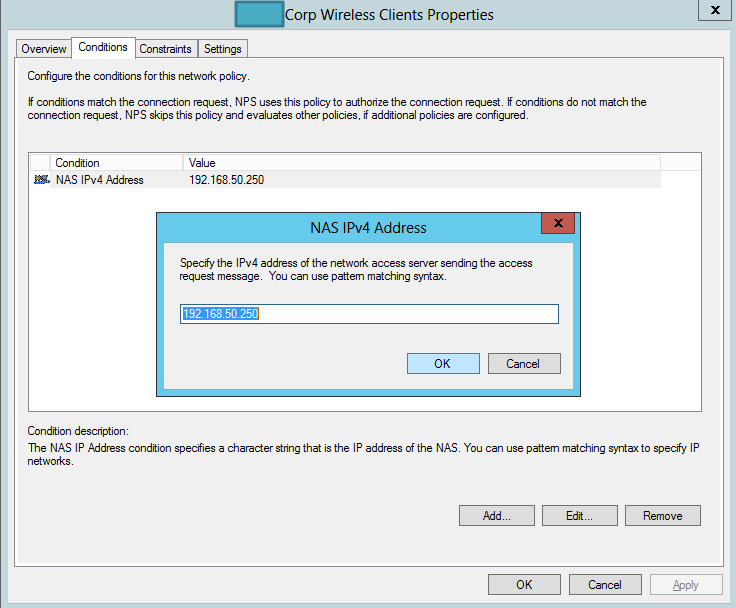
You’ll need the IP address of the WLAN controller (this example is 192.168.50.250) , configure the shared secret as you’ll need it for the Cisco WLAN.

MS config 001

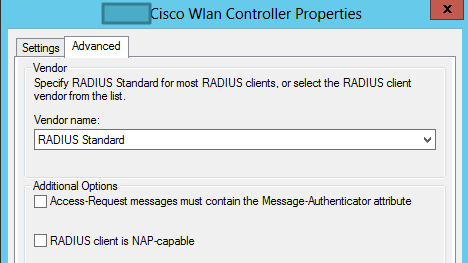
For the properties portion, use RADIUS Standard.  You can choose a specific Cisco device – but for this example and setup the RADIUS Standard works.

MS config 002

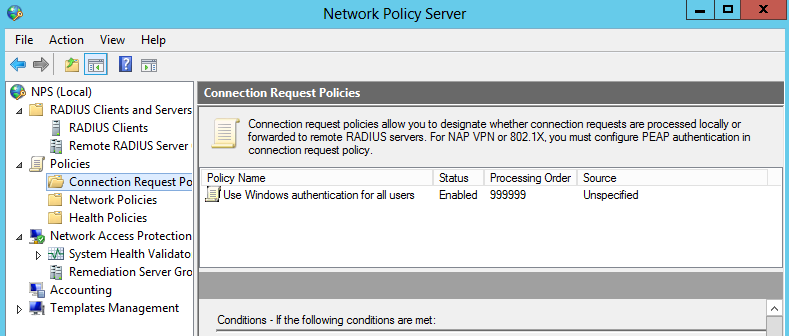
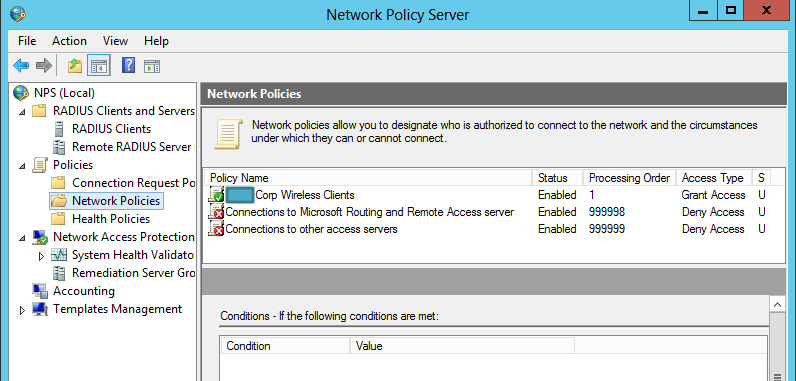
Next, click on Connection Request Policy, we’re going to create a new policy to use this server as the RADIUS authentication server

ScreenClip

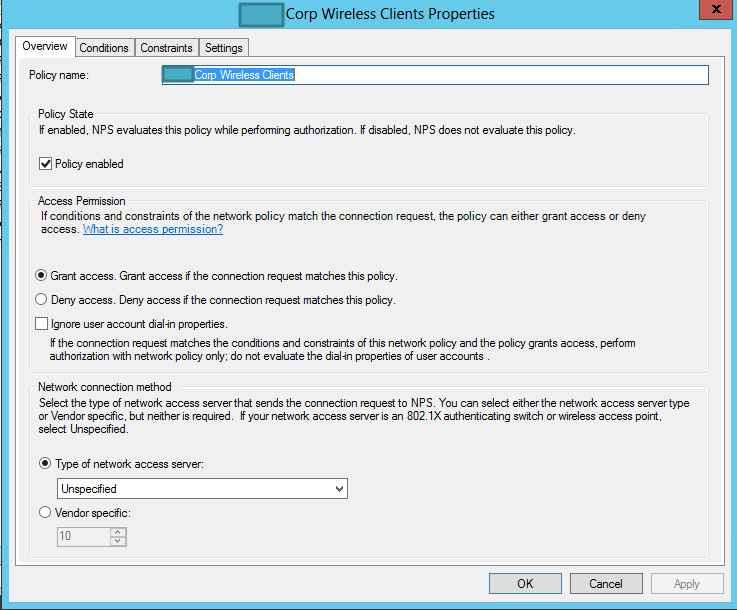
Give your Policy a meaningful name and make sure it’s enabled

MS config 003

For the Overview, make sure you check “Grant Access”, otherwise your clients will not connect.  You don’t have to specify the network access server for this example.

MS config 006

Under Conditions, enter the IP of the Cisco WLC as an NAS IPv4 Address type.  When IPv6 becomes available, you’ll see how this will change.

MS config 008

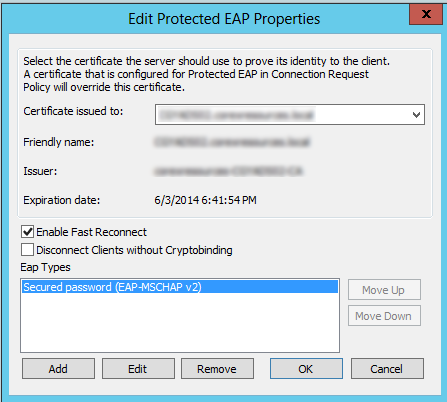
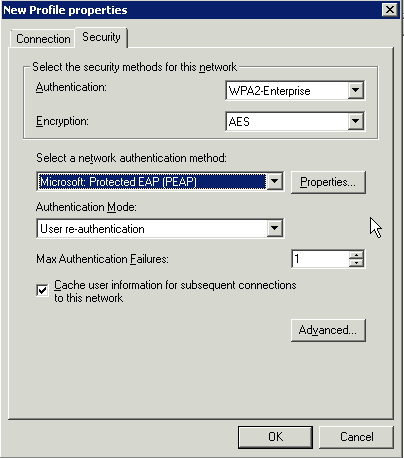
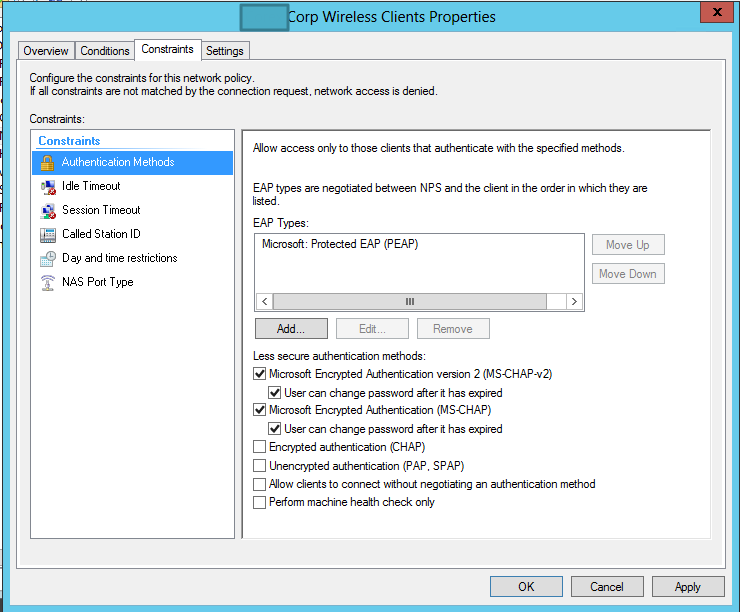
For Constraints, choose Authentication Methods, and add in Microsoft: Protected EAP (PEAP).  Make sure it has the same checkmarks as the ones below:

MS config 009

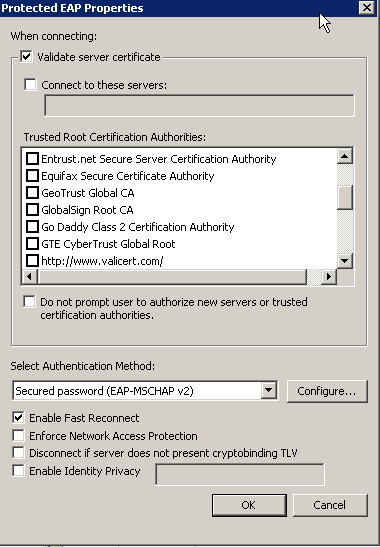
Highlight and click Edit… on the PEAP properties.  Here is where you want to ensure you have the proper Certificate.  Earlier in this tutorial, I mentioned using an RAS-IAS certificate over a domain issued certficate as the expiry date can be lengthened by a wider margin.  In your dropdowns, you should see this one, and your domain certificate (if this is a domain server).  If you’re having trouble deciding which certificate is which, Run the Windows Certification Authority and look at your issued certificates, the Certification path shows the name.  Use the appropriate one you want.  You should have only 1 option for EAP type: MSCHAP-V2.

MS config 010

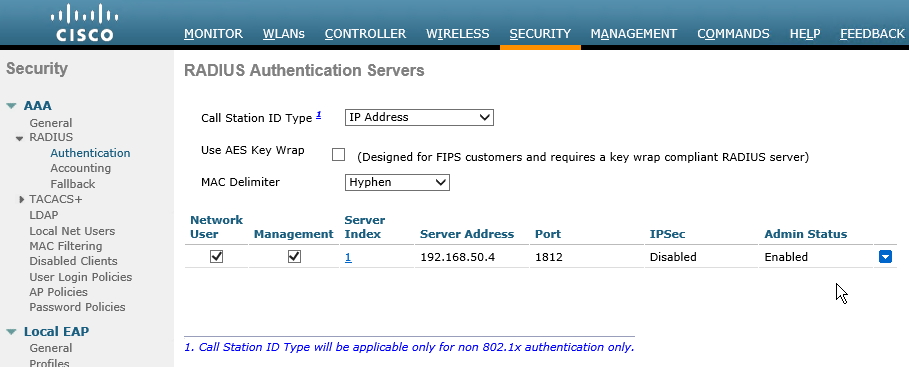
Next, log into your Wireless Lan Controller to do additional configuration.  For this example, I’ve already created by Wireless network and given it an SSID (longer steps are involved for that of course).  From the WLC main page, navigate to the Security Tab, and along the left hand side choose RADIUS->Authentication.  Add a new Server Address, here I’ve plugged in the IP of my Windows NPS.  Keep the default port 1812.

Cisco config 006

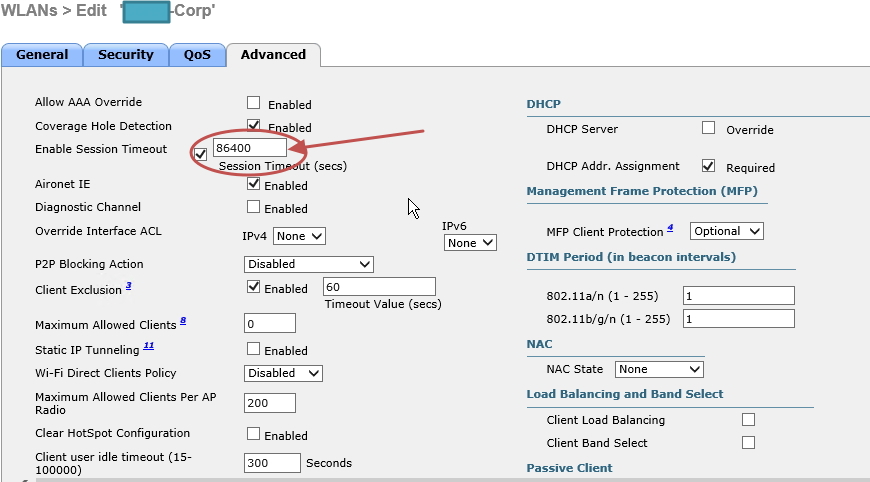
For my Cisco IOS version, I had to change my Session Time out value to 24 hours (86400 Seconds) as it was dropping every few minutes.  Older Cisco IOS versions don’t have this issue- could be something to do with Server 2012 polling.  Your mileage may vary.

Cisco config 005

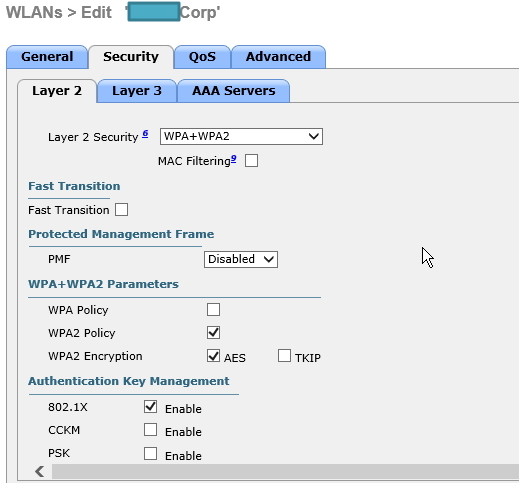
After adding in the IP of your NPS server, click on the SSID you want to use authentication, and choose the ‘Security’ Tab, in the sub tabs choose ‘Layer 2’, choose WPA+WPA2 for the type of security.

Cisco config 002

Next, choose ‘AAA Servers’.  For the first server, it should populate to the IP of our NPS server we did in a previous step.  The port will show up as 1812 (the default value) as well.  Make sure to use LDAP authentication to the same server, or the IP address of your domain controller if your NPS lives elsewhere.  Note the port changes for LDAP versus RADIUS NPS.

Cisco config 004
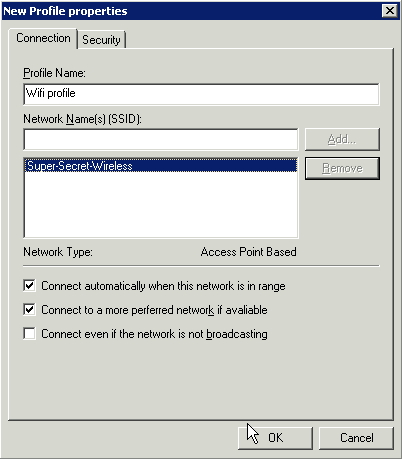
Save your changes and you should now have a functioning WPA wireless using RADIUS for authentication.  There are a few caveats here; you need to EXPORT the certificate used for authentication from the NPS server, and IMPORT into your Windows Laptop, then configure wireless to use said certificate and Windows domain.
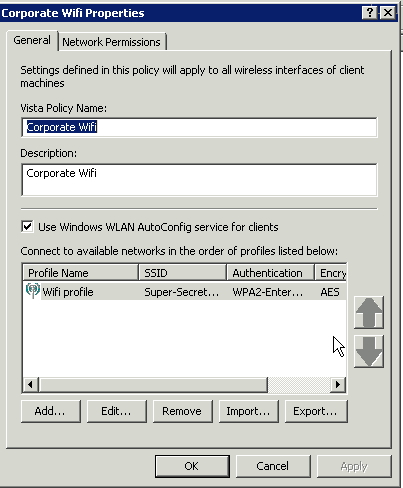
Part 2 will cover adding the certificate and wireless network via Group Policy.

Microsoft KB2670838 the EVIL update

Evil MS Update KB2670838

When patching desktops in particular, this update in some instances kills all Aeroglass ability and Windows Desktop Experience management.  I first noticed this on my personal Windows 7 64 bit laptop with a 2GB Nividia card, the Aeroglass wouldn’t work and all my applications were running on strictly hardware only for video settings.
Some MS blogs point out this update is necessary for IE10, which already has a slew of problems for business environments.  My advice is to avoid this update until IE10 is ready for prime time!

Ninite – update (almost) everything in one shot


Still sitting at your computer updating one application at a time, chained to your desk perpetually hitting the “next” button until the next prompt?  Unchecking boxes so bloatware doesn’t sneak into your installations?  Screw that – take control of your updates with ninite.  Ninite installs multiple applications at once, with some very important caveats:

1. It is unattended

2. It does not install any additional bloatware

3. It does not require you to go to more than one website to accomplish either 1 or 2.

It’s simple: head to www.ninite.com and choose the apps you want, download the installer and save to desktop or run from browser.  It walks you through what it’s doing with each installer and gives you the most up to date software for whatever you picked.

You can even save the file, and double-click it later on to update your software without having to pick them again.  How easy is that?


As an IT guy, this helps tremendously; any tool I can use that can automate my day and gives me more time to do other stuff is great.  Now I can get back to facebook creeping people.


-Dexter

Handy App of the day: Space Sniffer

If you’ve been working on Windows based computers or servers, or Windows File Servers, a time will come when you have to figure out how much space you’re using and what type of files are taking up space.  I’ve used Tree Size Free, WinDirSTAT and Filemenu Tools many times in the past but always found that they take too much time, need to be installed or don’t have proper visualizations.

SpaceSniffer seems to be the near perfect solution: it’s free, runs portable (no installer necessary), has great visualizations and is FAST.

Color Coding comes in handy for types of media, file classes, and even free space.

Compared to Filemenu tools or WinDirSTAT, Spacesniffer also does it’s calculations in real time; deletion of a file updates the entire diagram.  There’s also the ability to ‘Zoom’ into a directory or choose a network location.

Simply awesome freeware.


-Dexter

Exchange 2010 SP2 Automapping issue

There’s a slight bug with the Exchange 2010 server, in that it automatically remaps any shared mailboxes you’ve used when the client is either Outlook 2007 or 2010.

If you’re mapped a mailbox in the past, an automapping feature kicks in and puts the mailbox back on your profile, even if you’re starting out with a brand new profile. To disable this, you have to log into your exchange server and issue some commands from the Exchange Powershell:

Add-MailboxPermission "domain\user" -User "domain\user2" -AccessRights FullAccess -AutoMapping:$false

domain\user = user mailbox you no longer want to view
domain\user2 = the primary user, usually the one you’re setting up

This has been tested on Exchange 2010 SP2 and SP1 successfully

Exchange 2010 – get list of disconnected mailboxes immediately

Once a mailbox is disabled from the Exchange 2010 console, it shows up in the disconnected mailboxes after the nightly maintenance.  Sometimes however, a company can change it’s mind at the last minute and decide to either hire someone back and that’s when the IT admin has to bring that disconnected mailbox back within the hour.

Instead of waiting around for the nightly maintenance to occur, you can force your Exchange 2010 server to pick up the mailboxes almost immediately.

1. First and foremost, re-enable the user’s Active Directory account, as it has all the proper SSID’s and is actually the name you want to restore.

2. Check the disconnected mail, if you just disabled it you likely will not see it
3. if you don’t see it there, you’ll have to manually do the mailbox cleanup (commonly known as maintenance.  Open up a Exchange power shell and issue the cmdlet:
Get-MailboxDatabase | Clean-MailboxDatabase

Be careful with this command, as it cleans all your mailstores.  If you have only one mailstore you want to run this command on, you have to use:
Clean-MailboxDatabas “Your Database Name”

4. Once you’ve done that, refresh your disconnected mailboxes and you should see the mailbox you want to reconnect:
 

5. From here, right click and reconnect the mailbox you want!
-Dexter

How to: get multiple Remote Desktop Connections

When you have to remote desktop to a Windows based server or computer, your default option is RDC protocol.  This is a useful utility if you’re connecting to one computer at a time.  So what if you need to connect to ten or more?  Do keep in mind, not all those computers have the same credentials, and saving all those .RDP files to your desktop will get very cumbersome.

There’s a handy tool from Microsoft: Remote Desktop Connection Manager that allows you to do just that.
As you can see from the screencap directly from MS techblog, the application lets you open multiple RDC connections at a time giving you full control over: inherited credentials, gateway settings for VPN connections, individual display settings, individualized local resources… the list goes on.  Super handy utility when I was building a new virtual environment with Hyper-V; after creation of the VM, I put in the server name with full credentials and saved it under the proper group.

I’ve used other tools similar to this such as the RSAT tool that felt unfinished, as well as RoyalTSVisionAPP, and Terminals.  All these programs worked well for what I used them for, but each had their own little quirks and last minute features such as screen-shot ability.  The part I like the most about RDC Manager from Microsoft is the price: completely free.  Plus, it just feels like it goes with the rest of the Windows experience, from the toolbars to the menus it definately feels like a MS product.

So if you need to remote to a hell of a lot of computers and like a freebie that’s right from Microsoft, give it a shot.
-Dexter