Synology DS420+ review


Introduction

A little over 7 years ago, I purchased a DS413J. It was everything I needed; lots of storage, ample power, and served media in the house suitably well. Fast-forward to 2020, the DS413J is feeling rather aged. The Web UI and 2FA login sometimes takes a little longer than two minutes to fully login. Transfer speeds at 30Mb/s feels unimpressive, and it takes sometimes up to 10 minutes to reboot.

I decided it was time to get into a DS420+. This would serve as my main file/media share while to leverage the CPU, upgradeable RAM and much improved performance.


History

Synology mainly deals in networking products. The company started with consumer network storage, and have expanded into IP surveillance, and consumer router hardware. Synology’s network storage is pliable across consumer to SMB all the way to corporate SAN. This is also where they really shine. A NAS – Network Attached Storage runs file shares without the overheard of a running server that consumes space, cooling, network, licensing, and power. Most of the NAS models – the DS series, which I’ll cover below are small, quiet, and very unassuming.

The consumer NAS market is competitive, with names like QNAP, Terra Master, Western Digital, Drobo, and Buffalo to name a few. While I won’t go into each of those name brands, I typically see consumers here in Canada picking between QNAP and Synology.

If you’ve ever wondered about the naming convention of the Synology NAS devices, I’ve broken it down here:

Synology DiskStation naming explained
  • 1 – Leading letters [DS][RS][DX]. DS – Diskstation (the formfactor you see here). RS – RackStation (Rack mounted NAS). DX – Diskstation Expansion, and so on.
  • 2 – The first number(s). Sometime a single digit. This is the maximum amount of internal drives the NAS can house, with expansion units. [ie. A 1812+ = 8 disks in unit, with 10 extra disks from expansion units allowed]
  • 3 – The last 2 digits. Demarks the year released. [DS413J = released in 2013, DS420+ = released in 2020]
  • 4 – The very last character denotes the performance. This does change depending on the market segment. Generally, the most common ones are J= home entry level, Play = media specific functions with some encoding, Plus (+)= performance level, XS = Top tier specifications.

Audience

Who buys a NAS? Who is it meant for? A NAS is meant for anyone with lots of data that needs to be securely and safely stored in a central location. I emphasize ‘central’ because we all know the pain of multiple USB drives. While convenient, they do end up in odd places or sometimes misplaced when you need them.

This is where a NAS steps in. One location for storing all the files, easily accessible by smart devices, and more flexible and cost friendly over cloud storage. A NAS can also stream media; which means you have the option to watch any owned, stored media on your device of choice. And, no streaming service fees either.

The Synology Diskstation Manager also offers a massive menu of different applications; security, webhosting, authentication, and surveillance. For guys like me, there’s Virtual Machine manager, Radius Server, Active Directory integration – the list keeps growing.

Hardware

CPU

Intel Celeron J4025 2-core 2.0GHz, burstable up to 2.9GHz

Memory

2GB DDR4 [expandable to 6GB]

HHD Bays

4 x 3.5″ or 2.5″ SATA HDD/SSD (not included)

2 x M.2 2280 NVMe SSD (not included)

USB

2 x USB 3.0 (front and back)

LAN

2 x 1Gbe RJ-45

AC

100 V to 240 V AC

HD Drive bays are all plastic and screwless. Everything has markings for sliding into the standard 3.5″ HDD pin holes. Included are screws for 2.5″ HDD’s as well. Once the HD’s are in the unit, they’re snug with no vibration. There’s also a Synology Key for each drive bay to lock each independently. The front of the unit has indicator lights for status, each individual drive, and the power button. One USB 3.0 connection in the front, and one USB 3.0 in the back. Sadly, there’s no Esata connection for expanded / backup storage. The double RJ-45 connections can also be used independently, teamed, or for failover.

Network protocols

SMB,AFP,NFS,FTP,WebDAV,CalDAV,iSCSI,Telnet,SSH,SNMP,VPN (PPTP, OpenVPN, L2TP)

File System

-internal: Btrfs, ext4

-external (connected via usb): Btrfs, ext4, ext3, FAT, NTFS, HFS+, exFAT

RAID types

SHR (Synology Hybrid RAID), Basic, JBOD, RAID 0/1/5/6/10

SSD Cache

-read/write cache support

-M.2 NVMe SSD Support

File Sharing Capacity

-Max local user accounts: 2048

-Max local groups: 256

-Max shared folders: 512

-Max concurrent SMB/NFS/AFP/FTP connections: 500

Virtualization

Vmware Vsphere 6.5, Hyper-V, Citrix, OpenStack

Software

Once again, the Disk Station Manager web GUI is flawless. On initial boot you’re asked to install the latest DSM, then format any installed Hard Disks. After it reboots again, it’s off to configure your RAID storage. Interesting note here, the official spec sheet mentions Synology Hybrid RAID (SHR) as an option. On first install with 2 disks, SHR was available.

Volume Creation Wiz rd 
Configure storage pool property 
(optional) 
RAID type: 
Minimum number of driæs 
SHR 
r RAID: 
Sto g e_ 1 
SHR 
1 (SHR with only one driæ will 
able to driæ 
This is the RAID type for uærs. this type 
pu to driæs of siæ in the to optimiæ siæ and 
to data

After installing another 2 disks, SHR was absent? I have a feeling the option was quietly removed to favor disks of the same size to fit industry standards.

Storage Pool Creation Wizard 
Configure storage pool property 
Storage pool description (optional): 
RAID type: 
Minimum number of drives per RAID: 
RAID 5 Description: 
RAID 5 provides fault tolerance and increased 
RAID 5 can sustain the loss of a single drive. I 
reconstructed from parity striped across the re 
performance is severely impacted while a RAID 
space and cost are more important than perfor 
Back 
Main-storage 
RAID 5 
RAID 1 
RAID 5 
RAID 6 
RAID 10 
Basic 
JBOD 
RAID O 
hree drives is required. 
from the failed drive is 
ad and write 
D 5 is ideal when 
Next 
Cancel

SHR has the ability to protect disks of different sizes. This isn’t a deal breaker to me, but it’s worth noting for someone that’s looking for this functionality. Just to point out, it IS best practice to use disks of all the same size for any sort of RAID configuration.

The Web GUI is incredibly quick and responsive. This largely because of the Intel Celeron J4025 processor and 2GB DDR4 RAM. Even after adding 2Factor authentication, it’s much speedier than my 413J. Creation of shares, installation of new packages, configuring Media services and Video station are easy and intuitive. During my initial burn in period, I mounted some external CIFS shares around my network to copy the data onto this 420+. I was never disappointed, the new DSM even provides an estimated time of completion for large jobs.

Usability

Disk Station Manager (DSM) rocks. Simple as that. Super robust, quick, snappy, it just does everything that regular desktop machine would do, just within the browser. Anything is at your fingertips within DSM. Some of the things I use on a regular basis are Hyper Backup, File station (when I want to do CIFS to CIFS transfers), Synology Drive and Storage Manager.

D isk 
Performance 
Task Manager 
Connected Users 
Speed Limit 
Settings 
Performance Alarm 
DSM Help 
CPU 
Memory Composition 
Resource 
Netvm rk 
Type : 
19.2 
Volu 
367.3 
507.8 
558.8 
Total 
4.6 Ga 
Desktop 
Click to up nctifiætions. 
Real 
utilization 8 
Ithy) 
used 3.31 TE 
capacity: 7. IE TB 
O System H It h 
Healthy 
Ym_'r S',molcgy NAS 
Resou«e Monitor 
CPU

Everything is intuitively set up. I do recommend setting Control Panel to ‘Advanced Mode’. Just in case you want to see things like the indexing service, external devices, Terminal or Privileges icons. All things are very straightforward, and the help menu is surprisingly, well, helpful. Customization of the login screen, desktop background, color theme, even image or icons are available. I’ve enabled 2FA for login, email notifications, quickconnect, media services all just by clicking around menu’s. The interface is simple enough to get you to your location, yet sophisticated and secure enough to give me comfort when I leave the house.

Features

Super Feature packed. I’ve noticed the Plus (+) series of Synology NAS offers much more packages than the plain “J” series. There’s even a beta package section I’ll be trying out soon. Each new feature brings new items to tweak, and more value to the Synology. Just the other day I configured Replication services, and Synology drive, next up will be Directory server.

It really is a dazzling array of programs this little NAS can run. There’s multiple sites that report using this strictly as a 4K Plex Server. I’ve even seen a few startup businesses using some of the bigger + (plus) models for storage and security with IP cameras. These really are customizable to no end, and based on the new up-and-coming Kubernetes images, these could one day replace traditional server technology.

The 420+ also offers an M2 cache buffer. I’m not quite using it yet, perhaps when I try out mail station or get heavier into web development I’ll populate the drives.

This also has an upgradeable RAM slot on the right of the unit to compliment the current 2GB DDR4. I’ve already got a 4GB stick in there – not best practice, I know; it should ideally be a matching 2GB stick. But I had an extra stick that matched the voltage lying around and thought I’d give it a shot. It’s been 3 weeks without any sort of hiccup.

The Android App store also has many of the general items, like file, video, audio, moments and DS cam. I also noticed there’s a Synology Chat icon in there, which I’m sure complies with secure communications between you and some friends. I’ve been using the DS finder since I have 2 NAS’s in the house, and it’s been great looking over the current usage when I run backup jobs or kube containers.

Verdict

Absolutely worth every penny! Speed, security, feature rich, and reliable name brand. Synology is really improving their DSM with every release, DSM 7.0 is already beta testing, which hopefully is a general release within 2020. My only complaint is a missing e-sata connection in the back of the unit. I could use some of the bigger DX expansion series – if I ever could fill that much space! For the price, the included features, the never-ending applications for any sort of business or personal need, this is another near perfect offering from Synology.

Ubuntu – Add Google 2FA for SSH

The Setup

Host: Ubuntu 18.04 “Bionic Beaver” release
Software: Google Chrome

Original article found on linuxbabe

Super handy, and secure way to ssh into your Linux Box at home. This uses the Android Google Authenticator for the QR code, generated right in the SSH window. And you get the added bonus of 6 one-time use codes to use.

To start, SSH into your Unbuntu computer as root.

$ sudo apt install libpam-google-authenticator

Then run the google-authenticator command to create a new secret key in your home directory.

$ google-authenticator

When asked:

Do you want Authentications to be time-based (y/n)

Answer Y!

The QR code should display in the SSH window, ideally you want to scan this into your Google Authenticator. Other sources point out that FreeOTP (developed by RedHat can serve the same purpose)

.

once scanned into your mobile Google Authenticator, you it should show as a new entry.

Configure SSH daemon to use google authenticator

$ sudo nano /etc/ssh/sshd_config

Add in:

UsePAM yes
ChallengeResponseAuthentication yes

Save file

$ sudo systemctl restart ssh
$ sudo nano /etc/pam.d/sshd

Add the lines

@include common-auth
Auth required pam_google_authenticator.so

Save the file!

Now anytime you connect to your SSH terminal to this server, you’ll receive the 2FA push

[ivory-search 404 "The search form 3350 does not exist"]

Ubuntu Chrome Remote Desktop configuration

The Setup

Host: Ubuntu 18.04 “Bionic Beaver” release
Software: Google Chrome

I thought this was weird: I couldn’t actually download the Chrome browser. Couldn’t do it from firefox (the Ubuntu default), or chromium (the open-source O.G Chrome package). I thought that was sort of weird. Like Ubuntu linux didn’t support it or something. This means it’s simply not available in the Ubuntu software repository.

There are lots of guides of “how to install chrome” onto Ubuntu. I’ve compiled that here, as well as how to install and configure Chrome Remote Desktop.

  1. Install Google Chrome From SSH shell:
wget https://dl.google.com/linux/direct/google-chrome-stable_current_amd64.deb
  1. Once installed, own the CHROME browser directly to https://remotedesktop.google.com. This will add the Chrome Remote Desktop Extension directly to Chrome for you.
  2. Install the Extension
  3. When asked, choose a PIN for your desktop

This is the part of the blog where you think everything works. Not in this case. I kept getting this error:

I thought, maybe it’s because I didn’t add myself to the chrome remote desktop users group.

$ sudo usermod -a -G chrome-remote-desktop my_user_name

At this point, I decided to reboot for good measure.

After reboot, the Chrome Remote desktop was now in the applications

Although I still couldn’t connect from another host, still times out. Kept giving me errors that the startdaemon wasn’t starting properly.

With some help from monkey patching, I eventually got it working. Here’s the steps broken down:

  1. Stop Chrome Remote Desktop
$ /opt/google/chrome-remote-desktop/chrome-remote-desktop --stop
  1. Backup the original configuration
$ sudo cp /opt/google/chrome-remote-desktop/chrome-remote-desktop /opt/google/chrome-remote-desktop/chrome-remote-desktop.orig
  1. Edit the config file with nano (or whatever editor you prefer)
$ nano /opt/google/chrome-remote-desktop/chrome-remote-desktop
  1. Find DEFAULT_SIZES and amend to the remote desktop resolution. For Example:
DEFAULT_SIZES = "1920x1080"

In my case, I set it to “1920×1200,3840×2400” since the desktop had dual-monitors.

Set the X display number to the current display number (obtain it with echo $DISPLAY from any terminal). On Ubuntu 17.10 and lower, this is usually 0, and on Ubuntu 18.04, this is usually 1:

FIRST_X_DISPLAY_NUMBER = 1

Change it to “20”.

FIRST_X_DISPLAY_NUMBER = 20.

In my case, it happened to be 1.

Comment out sections that look for additional displays:

#while os.path.exists(X_LOCK_FILE_TEMPLATE % display):
<p><code># display += 1

Reuse the existing X session instead of launching a new one. Alter launch_session() by commenting out launch_x_server() and launch_x_session() and instead setting the display environment variable, so that the function definition ultimately looks like the following:

def launch_session(self, x_args):
self._init_child_env()
self._setup_pulseaudio()
self._setup_gnubby()
#self._launch_x_server(x_args)
#self._launch_x_session()
display = self.get_unused_display_number()
self.child_env[“DISPLAY”] = “:%d” % display

Save and exit the editor. Start Chrome Remote Desktop:

Sudo /opt/google/chrome-remote-desktop/chrome-remote-desktop --start

On a VM, this seems to fail. BUT on a physical box, i’m connected to it even as I write this without any issues.

Just have to get used to picking what session you want, Xsession, and I think the other was was regular ‘ubuntu’ session or something. Has to do with the different environments, one environment is strictly for when you’re sitting physically in front of the computer, the other is the remote session stuff over things like VNC.

Remoting in from external shows this on first boot up:

Once you select the session, that’s the same session you connect in with every time.

I’ve been using the 2nd option – “Ubuntu”

Breakdown of each option:

(default) – launch the default Xsession. This looks the same as “ubuntu” session. All the windows look the same, and the same settings seem to apply.

Ubuntu – I use this most often, looks like VNC ties to this instance too. Actually, I think the above selection (default) is just whatever you pick between ‘ubuntu’ session and ‘unity’ session.

Unity – looks like a completely different OS. The icons are different, the experience, everything. This appears to be a graphical interface of sorts, sort of like the flavors of KDE or GNOME.

There you have it, you now have a functioning Chrome Remote Desktop to your Ubuntu Box.

[ivory-search 404 "The search form 3350 does not exist"]


Oracle VirtualBox – Configure Guest-VM network to communicate with Host network

This is going to focus on configuring an Oracle Virtualbox VM to do a few things:
-make it so the host, and local host network can see, ping, remote and use fileshares to the Oracle Box guest VM
-Enable the Oracle box VM to still use it’s own built in DHCP (in case you have your own domain)

*I take no liabilities in configuring any of this, I had to figure this all out with trial and error!

The Setup

Host: Ubuntu 18.04 “Bionic Beaver” release
Software: Oracle VirtualBox (version 5.2.42-dfsg-0-ubuntu 1.18.04.1)
VM: Microsoft Server 2016 Domain Controller

For the purpose of this entry, I’m skipping over the creation of a VM, domain configuration and DHCP. All that’s configured within the Guest-VM Operating System. I won’t go into that, but what I will provide is a problem, and solution.

Problem
How can we get a already existing VM running MS domain services, to use it’s already pre-configured DHCP Scope, and yet allow it to talk with the rest of the host network?

Solution (short explanation):
Create a second network adapter in ‘bridged mode’, keep the primary network adapter in ‘NAT’ mode. Configure firewall rules on the Guest-OS to allow access.

Solution (long, and drawn out):
To preface this problem, I had a pre-existing domain controller with it’s own DHCP server. DHCP itself was handing out a 10.0.150.1/24 series of IP’s.

My VM Host however is on my home network, we’ll say that’s a 10.0.0.1/24 network. So how do we configure our VM to have access to our home resources?

First, turn off your VM.

1.Create a second Network adapter! From VirtualBox Manager goto Settings…

Orade VM Virtu•IBox M •na%r 
New Settings 
DC01 
Running 
Show 
>ettings...<br />
Clone.<br />
denove„<br />
Show<br />
Eause<br />
Machine Tools<br />
Global Tools<br />
Ctrl•S<br />
ctrl-o<br />
lists all virtual machines and virtual<br />
mputer.<br />
represents a set Of tools Which<br />
n be opened) for the currently<br />
Of currently available tools check the<br />
right side Of the main tool bar<br />
indow. This list Will be extended With

2.Goto Network.

For this VM, I put in a NAT network. There’s dozens of different ways to do this, but for this example, I created a NAT with a specific scope to isolate my domain for testing purposes. Here’s the Oracle VirtualBox documentation.

DOI settings 
Network 
Adapter 1 Adapter 2 
@ gnable Network 
(2 
General 
System 
Dtsplay 
Storage 
Audio 
Network 
Serial Ports 
Shared Folders 
user Interface 
Attached to: 
Name: 
v Advanced 
Promiscuous Mode: 
MAC Address: 
NAT Network 
VNATOI 100150.0/24 
Deny 
@ Cable Connected 
Port rorwaldirg

3.Create a New Network Adapter. Configure as ‘Bridged Adapter‘. In layman’s terms, a Bridged Adapter just means it’s using the physical connection from your host, and the VM is filtering data from the host.

General 
System 
Dtsplay 
Storage 
Audio 
Netvvork 
Serial Ports 
(2 
Shared Folders 
user Interface 
DOI settings 
Network 
Adapter 1 Adapter 
@ gnable Network 
Attached to: 
Name: 
v Advanced 
Promiscuous Mode: 
Address. 
Bridged Adapter 
enp0s25 
MT Oes«oø 
Deny 
@ Cable Connected 
Port rorwaldirg

4.From the Guest-VM, configure the networking to the same as the Host. You will need a static address from your DHCP – likely your home router or otherwise.

Internet Protocol Version 4 (TCP/IPv4) Properties 
Guest VM properties 
You can get [P settngs assigned automatcally if pur neb,Nork supguyrts 
this capability. Otherwise, you need to ask your neb,Nork administrator 
for the appropriate [P settngs. 
C) Obtain an [P address automabcally Example IP config 
• use the following [P address: 
[P addr ass: 
Subnet mask: 
Default gateway: 
101 
255 
255 
255 
Obtain DNS server address automatcally 
• use the following DNS server addresses: 
Preferred DNS server: 
Alternate DNS server: 
[3 Validate settings upon exit

5.Configure the Guest-VM firewall rules to allow traffic from that specific subnet.

  • Goto Firewall settings (depending on your flavor of VM, this is a Windows VM so your mileage may differ), advanced settings -> Inbound rules.
  • Scope (local IP addresses): the IP of your Guest-VM
  • Scope (remote IP addresses): the IP, or range of your management workstations on your Host subnet

allow all 10.0.0.1/24 traffic Properties 
Programs and Services 
Remote Computers 
Protocols and Ports Scope Advanced local Principals Remote users 
Local IP address 
C) Any IP address 
VM-Guest Sample Rules 
@ These I P addresses 
1000101 
Ram ove 
Remote IP address 
@ Any IP address 
O These IP addresses

  • Protocols and Ports: I set mine to ANY. It’s up to you what you want to expose from your Guest-VM to your Host.

allow all 10.0.0.1/24 traffic Properties 
Programs and Services 
Remote Computers 
Protocols and Ports Scope Advanced local Principals Remote 
Protocols and ports 
Protocol type 
Protocol number 
local port 
Remote port 
VM-Guest Sample Rules 
Example 80. 443. 
Example 80. 443. 5000-5010 
Intemet Control Message Protocol 
(ICM P) settings 
Customize ..

Programs and Services: ALL. Again, it’s up to you what you want to expose.

allow all 10.0.0.1/24 traffic Properties 
Protocols and Ports Scope Advanced local Principals Remote Ll sem 
Programs and Services 
Remote Computers 
Guest-VM Sample Rules 
@ All meet the specified conditions 
C) This program 
Application P ackages 
Specify tha application packages to which 
this rule applies 
Specify the services to which this rule 
applies

6.Now Test the configuration from your Host or a management computer on the same Host subnet:

test-netconnection -ComputerName 10.0.0.101 -Port 3389 -InformationLevel Detailed


(you can use ping test too, but I like to see the specific port)

ComputerName 
. 10.0.0.101 
RemoteAddress 
. 10.0.0.101 
Remoteport 
. 3389 
. 10.0.0.101 
Matchi I es 
Networklsol ationcontext : 
Internet 
IsAdmi n 
False 
InterfaceAI as 
Sour ceAddress 
. 10.0.0.36 
NetRoute (NextHop) 
. o.o.o.o 
TcpTestSucceeded 
. True

Success! Connection to the RDP port 3389 works!

Now you can remote desktop to your VirtualBox Guest-VM from within your network. Also means you can continue deploying VM’s to that Virtual Domain Controller’s DHCP. Hope this helps the next person.

[ivory-search 404 "The search form 3350 does not exist"]

GPO enable VSS in Win 7

GPO VSS 1

Volume Shadow copy has saved my butt on file, exchange, and SQL servers.  Typically, IT departments discourage previous versions on desktops mainly because it opens up issues with disk space and if it’s really worth saving or rescuing an MP3 or AVI.

Of course, if you have the space on your client machines to do it, you can enable VSS and grant users the chance to recover files right from their own desktop machines.

First, create a new GPO and give a give it an appropriate name.
1. Enable the Volume Shadow Copy Service (VSS):

Computer Configuration->Windows Settings->Security Settings->System Services->Volume Shadow Copy and set to Automatic.

GPO VSS 3

2. Now give your users the ability to restore the files on their local PC’s:
User Configuration->Policies->Administrative Templates->Windows Components->Windows Explorer->Previous Versions->

Prevent restoring previous versions from backups  – disabled
Prevent restoring local previous versions – disabled

See the Previous Versions setting

GPO add corporate picture to your AD logon account

Win 7 default picture

The default windows logon picture, while very stock is a bit boring. If you’re in the corporate environment where a more suitable logon picture is preferred, here are your steps to adding a default picture to all user’s profiles.

First, pick a picture and make your edits to make it EXACTLY 128 x 128 pixels (you can use the picture in this post as a guide). Make your edits accordingly and make sure to save it with a .BMP extension.

Create a new GPO, name it ‘Default Win7 logon picture’. Goto
User Configuration -> Preferences -> Windows Settings -> Files and create a new file

Create a new file in User Configuration-><figcaption id=Preferences->Windows Settings->Files->New” width=”280″ height=”390″> Create a new file in User Configuration->Preferences->Windows Settings->Files->New

Set Action to Replace
For Source file, place your newly created .BMP in the GPO unique ID path: (you can find it by going to the details tab of the newly created group policy)

note your unique ID here

The resulting path in the source file should look like:
\\domain\SYSVOL\domain\Policies\{really-long-unique-gpo-identifier}\User\Preferences\Files\User.BMP

For Destination File, enter:
C:\ProgramData\Microsoft\User Account Pictures\user.bmp
(to change the local windows 7 .BMP picture)

It should look like the above, be sure to be wary of the direction of your slashes "\"
It should look like the above, be sure to be wary of the direction of your slashes “\”

Lastly, apply the GPO to the proper User OU and make sure to do a Gpupdate /force.

*Alternatively, you can place your .BMP in a separate share on your network, ideally a DFS model will do as a general share requires full permissions.  The size of this particular .BMP was only 100KB, so Active Directory replication will be minimal.

Configuring NPS on Server 2012 with Cisco WLC: Part 2

In part 1 of this tutorial, I stepped through configuration of the Cisco Equipment and configuration of the Network Policy Server with Certificate.  In this tutorial, I’ll show you how to tie it all up in Group Policy.

This tutorial already assumes you have the following:
*Group Policy objects SPECIFICALLY for laptop computers
*CA certificate created

Group Policy can make your life easier especially if you have a large environment.  It’s important to have a good, CLEAN Active Directory free of clutter or orphaned objects (re: objects you don’t know about).  I suggest separating your computer accounts by PC and Laptop, laptops will get the wireless group policy while the PC’s won’t as they are typically hard lined into a RJ45 Jack.

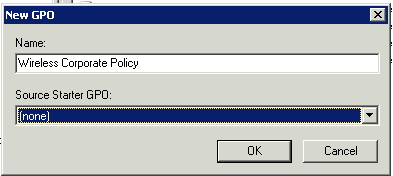
First, create a new GPO: give it a meaningful name

Image 001

Once created, drill down into Computer Configuration->Windows Settings->Wireless Network (802.11) Policies and create a new Windows Vista (AKA Windows 7-8) Policy.  Tailor this to your needs, you can easily create a Windows XP Policy as the screens are very similar.

Image 002

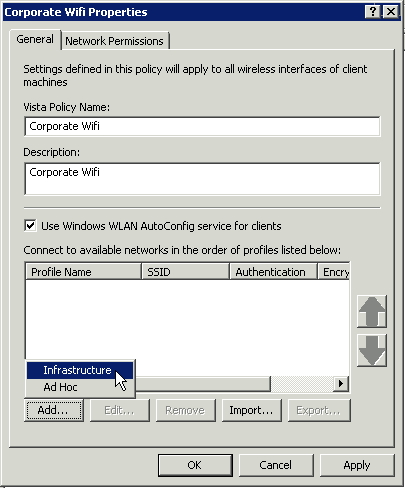
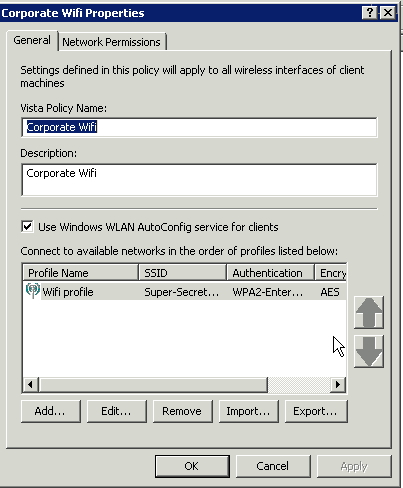
Create a Policy Name, I gave mine simply ‘Corporate Wifi’.  I also used the Windows WLAN configuration utility.  This means if you’re using the Dell connect utility or the HP connection manager this Group Policy will not work.  Again, depending on the laptops you’re configuring you’ll have to make adjustments.  This guide assumes you’re formatting laptops with standard Windows Operating Systems with no additional bloatware.

After giving it a policy name, add an Infrastructure network (on the bottom).

Image 003

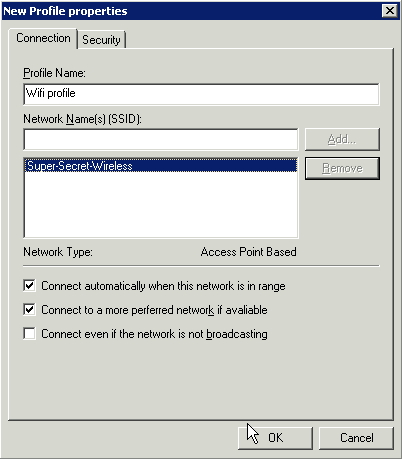
The Profile Name will be what shows the client is connected to – this means you have the opportunity to give your SSID another name to your internal employees.  For this example, I have an SSID of ‘Super-Secret-Wireless’, but the Profile name is simply ‘Wifi profile’.  When your users connect to wireless, they will only see they are connected to ‘Wifi profile’.

Image 004

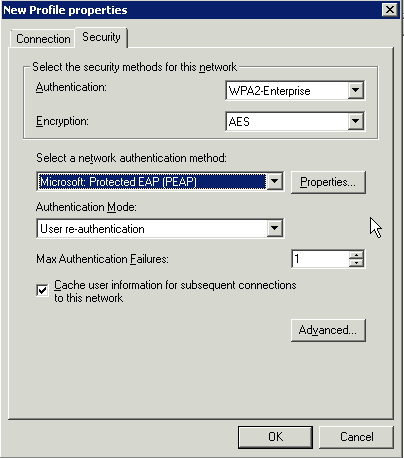
Click the Security Tab to change your SSID’s security settings.  I’m using WP2-Enterprise authentication with PEAP and a certificate.  To choose the certificate, click on Properties beside your authentication method.

Image 005

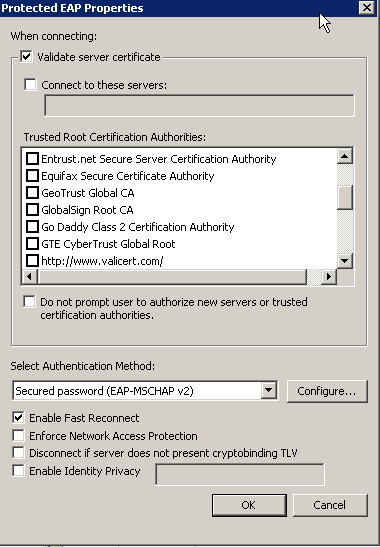
Ensure you’re validating the Server Certificate, then put a checkmark on the certificate you created in the first part of this tutorial.  To ensure you clients have the certificate, you can use a GPO to install the certificate for you automatically.

Image 006

Once you’ve added the profile, you’ll see it as one of the SSID’s in your associated Vista wireless policy

Image 007

That’s about it.  As long as your client has the certificate, and you force a GPUPDATE they should be connected to your new wireless without your need to touch every laptop.

Image 008

The last tutorial was done on Server 2012, these screen caps were done from a 2008 server.  Don’t worry, most of the content is still the same across both operating systems.

Configuring NPS on Server 2012 with Cisco WLC: Part 1

This How-to article is meant to configure Windows Server 2012 Network Policy Server, Certificate Authority with a Cisco WLC 2504 series (with Software version 7.4.100.0)

As specific as that list is, much of what Cisco offers with older IOS versions still holds true.  The authentication model still works, particularly the 802.1x configurations.  From the get go, you will have to create a new certificate if it’s not a Domain Controller.  This link explains in depth creation of a Certificate for use on a PEAP authentication model.  If you do have a domain controller, you can use the domain certificate for this purpose.

I recommend creation of a an RAS-IAS certificate and pushing the certificate via GPO, namely as you can change the expiration date of the certificate (like 10 years in the future if you really want).

First, configure the NPS:

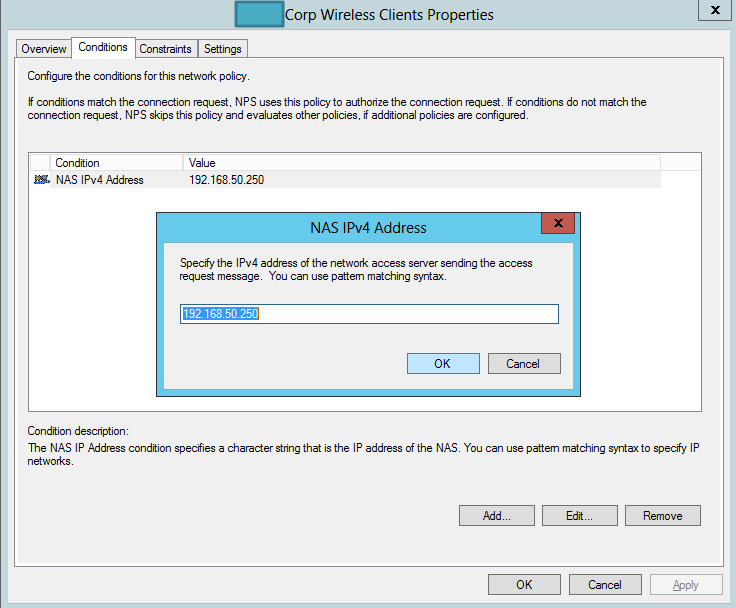
You’ll need the IP address of the WLAN controller (this example is 192.168.50.250) , configure the shared secret as you’ll need it for the Cisco WLAN.

MS config 001

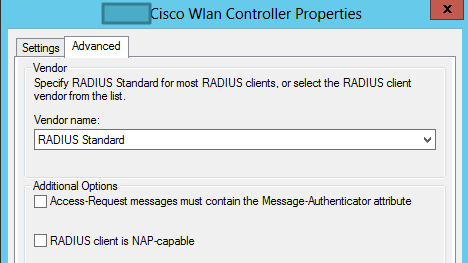
For the properties portion, use RADIUS Standard.  You can choose a specific Cisco device – but for this example and setup the RADIUS Standard works.

MS config 002

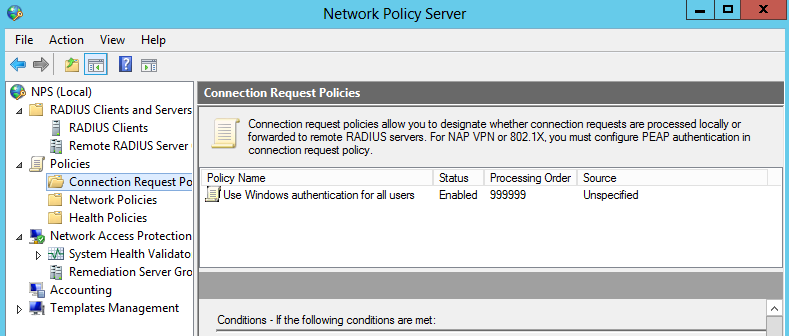
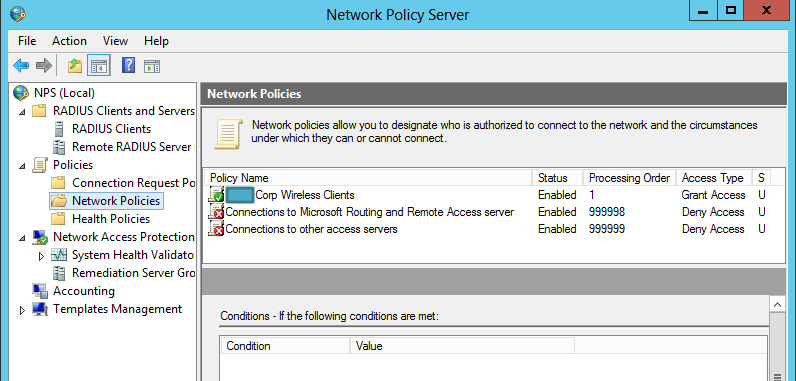
Next, click on Connection Request Policy, we’re going to create a new policy to use this server as the RADIUS authentication server

ScreenClip

Give your Policy a meaningful name and make sure it’s enabled

MS config 003

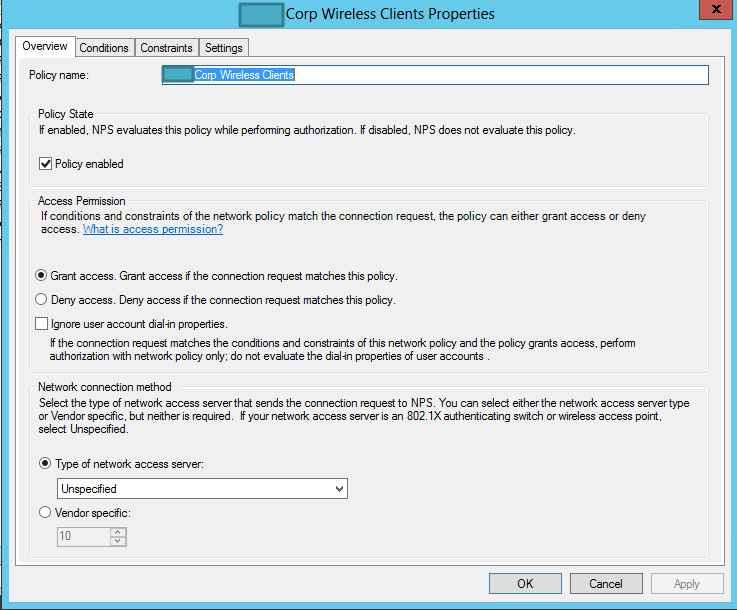
For the Overview, make sure you check “Grant Access”, otherwise your clients will not connect.  You don’t have to specify the network access server for this example.

MS config 006

Under Conditions, enter the IP of the Cisco WLC as an NAS IPv4 Address type.  When IPv6 becomes available, you’ll see how this will change.

MS config 008

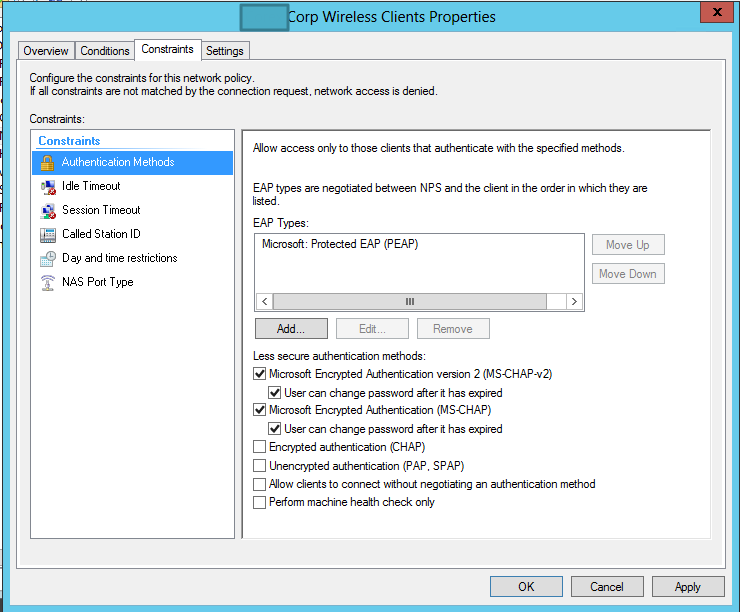
For Constraints, choose Authentication Methods, and add in Microsoft: Protected EAP (PEAP).  Make sure it has the same checkmarks as the ones below:

MS config 009

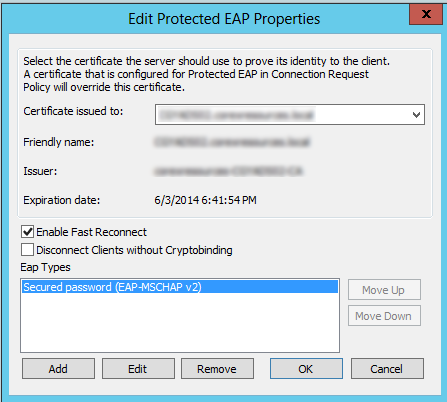
Highlight and click Edit… on the PEAP properties.  Here is where you want to ensure you have the proper Certificate.  Earlier in this tutorial, I mentioned using an RAS-IAS certificate over a domain issued certficate as the expiry date can be lengthened by a wider margin.  In your dropdowns, you should see this one, and your domain certificate (if this is a domain server).  If you’re having trouble deciding which certificate is which, Run the Windows Certification Authority and look at your issued certificates, the Certification path shows the name.  Use the appropriate one you want.  You should have only 1 option for EAP type: MSCHAP-V2.

MS config 010

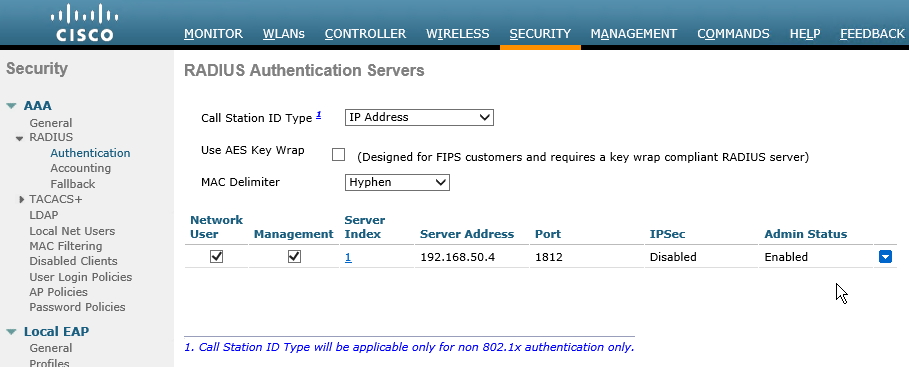
Next, log into your Wireless Lan Controller to do additional configuration.  For this example, I’ve already created by Wireless network and given it an SSID (longer steps are involved for that of course).  From the WLC main page, navigate to the Security Tab, and along the left hand side choose RADIUS->Authentication.  Add a new Server Address, here I’ve plugged in the IP of my Windows NPS.  Keep the default port 1812.

Cisco config 006

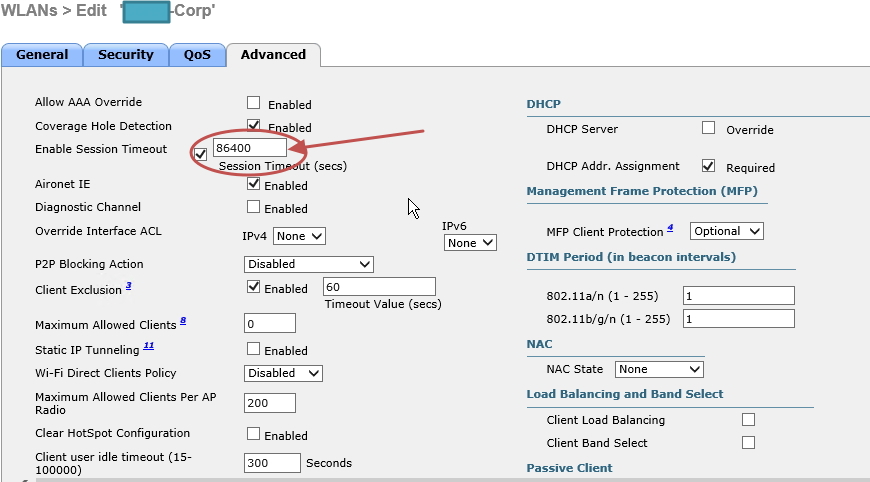
For my Cisco IOS version, I had to change my Session Time out value to 24 hours (86400 Seconds) as it was dropping every few minutes.  Older Cisco IOS versions don’t have this issue- could be something to do with Server 2012 polling.  Your mileage may vary.

Cisco config 005

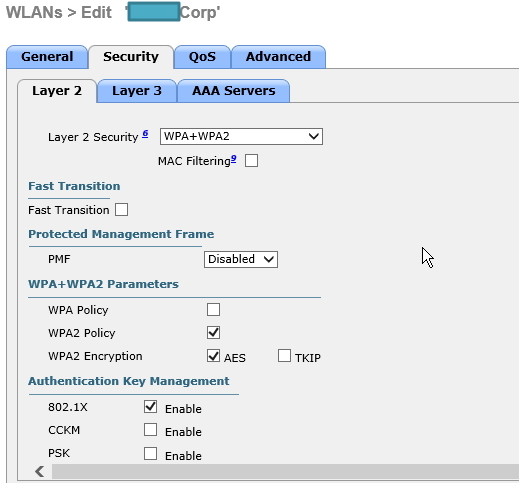
After adding in the IP of your NPS server, click on the SSID you want to use authentication, and choose the ‘Security’ Tab, in the sub tabs choose ‘Layer 2’, choose WPA+WPA2 for the type of security.

Cisco config 002

Next, choose ‘AAA Servers’.  For the first server, it should populate to the IP of our NPS server we did in a previous step.  The port will show up as 1812 (the default value) as well.  Make sure to use LDAP authentication to the same server, or the IP address of your domain controller if your NPS lives elsewhere.  Note the port changes for LDAP versus RADIUS NPS.

Cisco config 004
Save your changes and you should now have a functioning WPA wireless using RADIUS for authentication.  There are a few caveats here; you need to EXPORT the certificate used for authentication from the NPS server, and IMPORT into your Windows Laptop, then configure wireless to use said certificate and Windows domain.
Part 2 will cover adding the certificate and wireless network via Group Policy.

Microsoft KB2670838 the EVIL update

Evil MS Update KB2670838

When patching desktops in particular, this update in some instances kills all Aeroglass ability and Windows Desktop Experience management.  I first noticed this on my personal Windows 7 64 bit laptop with a 2GB Nividia card, the Aeroglass wouldn’t work and all my applications were running on strictly hardware only for video settings.
Some MS blogs point out this update is necessary for IE10, which already has a slew of problems for business environments.  My advice is to avoid this update until IE10 is ready for prime time!

Ninite – update (almost) everything in one shot


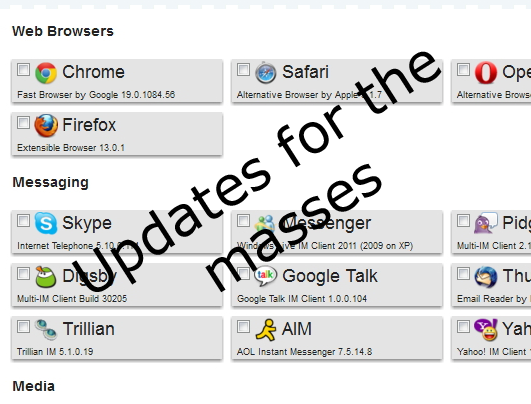
Still sitting at your computer updating one application at a time, chained to your desk perpetually hitting the “next” button until the next prompt?  Unchecking boxes so bloatware doesn’t sneak into your installations?  Screw that – take control of your updates with ninite.  Ninite installs multiple applications at once, with some very important caveats:

1. It is unattended

2. It does not install any additional bloatware

3. It does not require you to go to more than one website to accomplish either 1 or 2.

It’s simple: head to www.ninite.com and choose the apps you want, download the installer and save to desktop or run from browser.  It walks you through what it’s doing with each installer and gives you the most up to date software for whatever you picked.

You can even save the file, and double-click it later on to update your software without having to pick them again.  How easy is that?


As an IT guy, this helps tremendously; any tool I can use that can automate my day and gives me more time to do other stuff is great.  Now I can get back to facebook creeping people.


-Dexter