How to get Green ticks on Google Drive back

Google Drive no Syncy for you

I’ve been using Google Drive to sync files for some time now, because it’s great having 15GB of storage sitting in the cloud that I can access anytime.  I’m not here to point out the merits of having a google account that needlessly and continually asks me to come back to my google+ account, and yes I find it annoying that gmail now separates my mail into confusing tabs that really don’t have any meaning to me.  That little rant is for another article.  Today, I’m going to show you how to get the green tick marks back on your google drive to show that all your files are syncing.

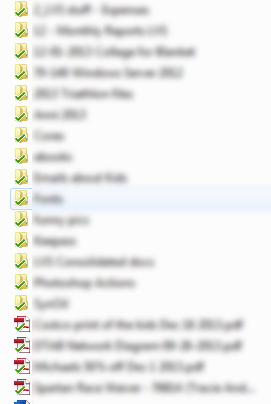
When I had google drive, I found I needed more cloud storage, so I installed Skydrive and most recently installed the Synology Cloud Station product.  What this does is make my bottom toolbar look like it threw up as I have close to 20 icons sitting in the corner.  Call me OCD, but I need to see all my icons and having them hidden drives me bananas. The problem with Windows Explorer is that it only allows for 15 slots for icon overlays.  What does this mean?  When you put more changing icons (such as the aforementioned skydrive, google drive that requires icons change to green for synced, red for unsyncable, or yellow or whatever color) you’re using up that 15 slot overlay.  In my case, my Google Drive puked and turned all the folders and files inside into normal looking icons – which normally wouldn’t be a problem, but I couldn’t see if any files had problems getting up to the cloud.  Here, I’ve compiled an easy to follow fix should you encounter the same situation.

These instructions are for Windows 7, and I’ve heard they work on Windows 8 as well.

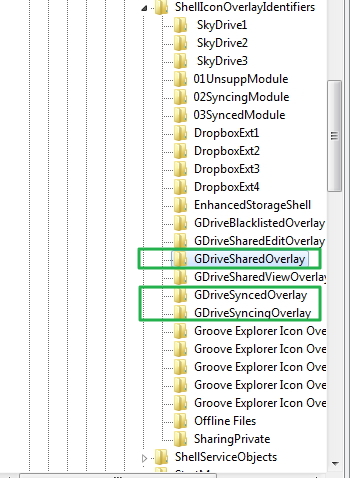
1. Run Regedit and navigate to HKEY\LOCAL_MACHINE\SOFTWARE\Microsoft\Windows\CurrentVersion\Explorer\ShellIconOverlayIdentifiers\

2.  Find these 3 entries: ‘GDriveSharedOverlay’, ‘GDriveSyncedOverlay’ and ‘GDriveSyncingOverlay’

Gdrive registry before
3. Add a prefix ahead of them: ‘0GDriveSharedOverlay’, ‘1GDriveSyncingOverlay’ and ‘2GDriveSyncedOverlay’, so it should look like this now:

Gdrive registry before-and after

4. Reboot your PC and take a look at your google drive icons – they should all re-appear with the green ticks:

folders after

You will have to repeat these steps over time, or whenever you overfill the 15 icon buffer limit on your Windows machine -so keep that in mind.

Handy App of the Day: SearchMyFiles

The other day I was tasked with finding all the duplicates in a large network share.  Large as in: 2TB worth of company data.  The previous IT company wasn’t so good at house cleaning so I was given the assignment of finding all the duplicate data that existed and archiving or deleting it to save space on backups.  After a little research, I found my answer in Nirsoft’s SearchMyFiles.

I’ve mentioned Nirsoft in the past with their export text software, and the SearchMyFiles app is another impressive tool they offer for free.

My first searches were for duplication software, it was only by pure luck that I stumbled across this gem as it was named a ‘search’ utility, and not a ‘duplicate’ utilty.  The functionality is right in the dropdown!

SearchMyFiles with Duplicates finder.  No frills here, options are simple and easy to configure
SearchMyFiles with Duplicates finder. No frills here, options are simple and easy to configure

While the software isn’t the prettiest, it is by far the most powerful and menu friendly.  No need to look and bump around with file and options as it’s all laid out to see.  There’s no installer either, so it’s a small footprint and can be run directly from a USB stick.

After about an hour, I had search results I could export into a spreadsheet and pour over with a fine tooth comb.

As you would imagine, the regular search utility works awesomely fast as well – going through a network share was a breeze, and you can specify how many folders deep you can go (infinite is an option).

Well done NirSoft, you’ve saved my bacon again!

-Dexter

Handy App of the day: Space Sniffer

If you’ve been working on Windows based computers or servers, or Windows File Servers, a time will come when you have to figure out how much space you’re using and what type of files are taking up space.  I’ve used Tree Size Free, WinDirSTAT and Filemenu Tools many times in the past but always found that they take too much time, need to be installed or don’t have proper visualizations.

SpaceSniffer seems to be the near perfect solution: it’s free, runs portable (no installer necessary), has great visualizations and is FAST.

Color Coding comes in handy for types of media, file classes, and even free space.

Compared to Filemenu tools or WinDirSTAT, Spacesniffer also does it’s calculations in real time; deletion of a file updates the entire diagram.  There’s also the ability to ‘Zoom’ into a directory or choose a network location.

Simply awesome freeware.


-Dexter

Windows 7 Wireless and Wired connections priority

I always thought that Windows 7 would automatically switch to the next fastest connection. I’d been trying to figure out why it seems to stick with a wireless connection even after connecting a network connection. Turns out, Windows 7 eschews speed for reliability.

I especially found this annoying when, after booting and automatically being connected to the wireless I plugged into CAT5 and tried transferring a file from my NAS only to see my wireless connection hitting the ceiling at 3.5MBps second. Luckily, I’ve found a solution that’s been covered in other places, but I like to put my own spin on things:

1. Goto Control Panel -> Network and Sharing Center, click on Change adapter settings

Image 000

2. From the adapter menu hit ‘alt’ to bring up the Windows File editing menu, and you’ll see the super-hidden ‘Advanced’ column that’s been evading you all these years.  Then to Advanced Settings…

Image 009


3.  This brings you to a listing of connections by priority.  Notice that Wireless is along the top, or first in priority.  Simply move the Local Area Connection to the top or just above the wireless connection.  Hit OK.

Image 003Image 002

4. All done!  Now the next time you boot up with wireless, and plug in a wired connection Windows 7 will automatically switch to the ‘fastest’ connection!